Sitecore introduced Sitecore Identity (SI) since version 9.1. This is a mechanism to log in to Sitecore. It provides a separate identity provider, and SSO (Single Sign-On) can be configured. This made the Sitecore instance architecture very scalable.
This concept is primarily an interaction between the Sitecore Identity Server and Sitecore Identity Clients.
Sitecore Identity Server
An OpenID Connect-compliant security Service. The deployment of any instance now has this server as an isolated instance living in the same Resource Group as configured. The URL is of the pattern https:://{instanceName}.{identityserver}. Sitecore Identity Server only works with HTTPS protocol.
Sitecore Identity Clients
A client is an application that authenticates users who are using the SI server. Each client must be registered with the SI Server before it can be used. The SI client requests security tokens, validate them, and create context users from these tokens. It can also bearer tokens to make authorized request to other services that are configured to accept tokens.
One of the examples could be Web Applications, Mobile or Desktop Apps connecting to the server. In this case the client is the Sitecore Instance itself. The Content Management Node can be used as an example.
Configure Azure AD
Register an Application, add to approved application in the Azure Active Directory Instance. We need the following handy before we configure the Identity Server.
Add the redirect URL to the Identity server URI. And also the suffix “/signin-oidc”
You need to enable ID Tokens to be passed between AD and Sitecore Identity Server. In the Application under Authentication enable “ID tokens”
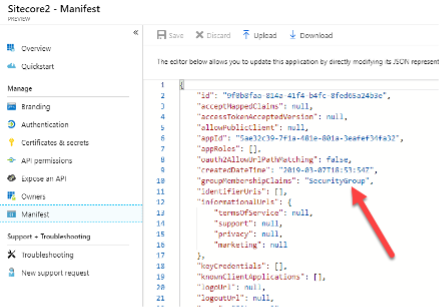
Make changes to the Manifest.
Copy the following for use from the Overview of the Application
- Application (Client) ID:
- Directory (tenant) ID:
Configure Sitecore Identity
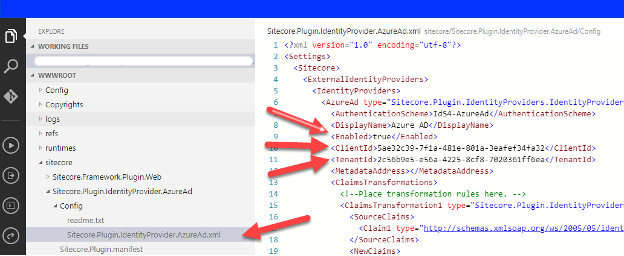
In the current instance, open the App Service with the Azure provided editor (in preview). Or establish FTP and navigate to the “/Sitecore/Sitecore.Plugin.IdentityProvider.AzureAd.xml” file and make the following changes:
- Under Settings:Sitecore:ExternalIdentityProviders:IdentityProviders:AzureAd, change the Enabled node to true.
- In the ClientId and TenantId nodes, you’ll paste the GUIDs copied from the Azure AD Application you just created.
User Transformation
Identity server typically do not recognize external accounts, when the Azure AD Credentials are passed by clicking on the Azure AD Button seen below (created in our earlier steps) the role/permissions are not set automatically. This could cause failure to authenticate.
To resolve that we need to create a group in Azure AD to use the Object ID of that user group and update the configuration in the Identity Server config file to setup a transformation.
Azure Group Setup
For this POC if you can create a temporary AD Group that is useful or use an existing Group, this is totally your choice base on the Security Governance Policies you have within your organization.
Transformation Setup
A sample code is present in the “\sitecore\Config\Sitecore.Plugin.identityProvider.AzureAd.xml” a sample is below
- Uncomment the xml block below as shown below
- Replace the guid with the group ID in line 35

For a sample xml please refer to the GitHubGist
Claims Setup
In the above step with the changes to the GUID for groups we have a claim setup as a Sitecore Author see the line 38 in the image provided above.
Similar to this we can create multiple claims and map each Group in Azure AD to a Role in Sitecore. We can have different type of Roles with various levels of permissions and restriction on each content Item to be very granular or site/tenant for that matter.
Important configuration
The custom user builder config needs to have the resolve=”true” as the code snippet below
<externalUserBuilder type="My.Foundation.Custom.AzureAD.CustomExternalUserBuilder, My.Foundation.Custom.AzureAD"
    resolve="true">
   <IsPersistentUser>true</IsPersistentUser>
</externalUserBuilder>
Review and Test the Login
Once the above configurations are setup, restart the App Service for the Identity Server and navigate to your Identity server URL.
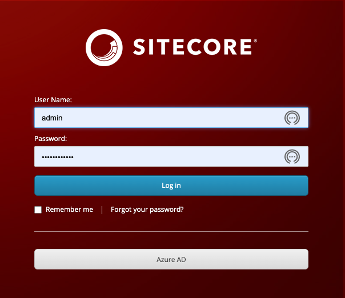
Click on the Azure AD button and a typical login screen should appear, once you have logged in successfully the user should land on the Sitecore dashboard.
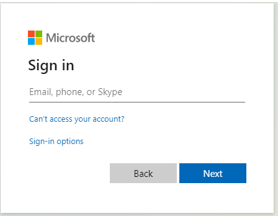
For convenience go to the CM server making sure you are not logged in, this will navigate you to the Identity Server URL, click on Azure AD button this will navigate back to your classic MS Login screen. On successfully authenticated the user will land on the CM Server.
Best Practices
Typically in any organization there are many users, not all users will end up using Sitecore. The best practice is to allow users with respective permissions by adding them to the respective Groups in AD, have a mapping Role in Sitecore and a Sitecore Admin can move them to an appropriate role. There could be a Blanket Role created in Sitecore so all the newly created users will fall into that group initially. Subsequently a User Admin can assign them the required Role(s).
Leave a Reply