Overcoming Setup Challenges While Prototyping with Sitecore + SXA and the VIBE Coding Method
As part of my ongoing exploration into modern CMS-driven architecture, I recently set out to prototype a concept using Sitecore with SXA (Sitecore Experience Accelerator), aligned with the VIBE coding method—a strategy designed to promote rapid, modular, and maintainable development within Sitecore environments.
The goal was to validate a design approach that leverages VIBE’s principles—Visual, Information, Behavior, and Experience—for building reusable components and structured content architecture. With SXA’s out-of-the-box capabilities for site scaffolding, component reuse, and layout flexibility, it felt like the perfect stack to explore this method in practice.
However, I encountered a roadblock early in the process: Sitecore download links were inaccessible due to security restrictions. Despite multiple attempts through verified Sitecore portals and community resources, the downloads for installation files were blocked or turned off.
Welcome to the first installment of this series, where I share key insights gained from migrating Sitecore across versions. Whether transitioning from on-premises to Azure, migrating workloads from AWS to Azure, or navigating complex upgrades, this series is designed to equip Sitecore customers with the knowledge and strategies needed for seamless execution.
Throughout this guide, we’ll explore critical considerations, feature priorities, and best practices for ensuring a smooth transition between environments. Stay tuned for expert insights that will help you optimize your Sitecore upgrade journey.
Overview of Sitecore 10.0: There are lot of Blogs to detail this aspects. I would like to indicate that Sitecore has been very good with the Change Logs so you can keep watching and reading more from time to time from the real source.
Why Upgrade?
Upgrading to latest versions of Sitecore is not just a recommendation; it’s a strategic necessity. With Sitecore having declared end-of-support for lower versions, continuing to use outdated versions can expose your organization to security vulnerabilities and lack of technical support. Customers have reported increasing difficulties in managing and maintaining integrations with third-party products, which can hinder operational efficiency and innovation.
Moreover, the build and development paradigm has evolved significantly. Sitecore introduces modern development practices and tools that streamline workflows, enhance performance, and improve scalability. By upgrading, you ensure that your platform remains robust, secure, and capable of leveraging the latest features and integrations, ultimately providing a better experience for both your team and your end-users.
One other way is to avoid code bloat, and also prepare to Move towards PaaS and SaaS from IaaS and or on-premises.
Preparation Steps: Before starting the upgrade, it’s essential to:
Assess Current Environment: Understand your current setup and identify any customizations or integrations.
Backup Data: Ensure all data is backed up to prevent any loss during the upgrade.
Review Documentation: Familiarize yourself with the official Sitecore upgrade documentation and guidelines.
Initial Setup: Begin the upgrade process by:
Setting Up a Test Environment: Create a staging environment to test the upgrade without affecting the live site.
Running Compatibility Checks: Ensure all modules and customizations are compatible with Sitecore, Sitecore Forms, Custom Components, Compatibility with SXA Modules are few of them to note.
Planning Downtime: Schedule the upgrade during a period of low traffic to minimize disruption.
Conclusion: Upgrading Sitecore is a strategic move that requires careful planning and execution. In the next post, we’ll dive into the detailed steps for upgrading to Sitecore 10.4, addressing common challenges and providing solutions.
Stay Tuned: Follow along as we guide you through each step of the upgrade process, ensuring a smooth transition and optimal performance.
In my journey of setting up a Sitecore XM Cloud Site Collection, my goal was to integrate it with Sitecore Content Hub for managing campaigns and leveraging Sitecore’s marketing capabilities. However, while deploying the project to Vercel, I encountered several issues that provided valuable insights into the deployment process.
First Roadblock: API Key Not Generated
Before pushing my code to Vercel, I ran into the following error:
[Leave space for an error image and description]
Upon investigation, I found that the API key was not generated correctly. Additionally, I noticed that the XM Cloud Deployment App contained two versions of JSS (JavaScript Services)—one of which was outdated (older than xxx.xx). This mismatch caused inconsistencies in key management. After generating the correct API key, I retried the deployment.
Second Roadblock: 404 NOT_FOUND on Vercel
After successfully resolving the API key issue, I proceeded with the deployment using the following commands:
vercel
vercel --prod
Unfortunately, this resulted in a 404 NOT_FOUND error. Unlike typical 404 errors, Vercel assigns specific meanings to different error codes, making it crucial to refer to their documentation for proper resolution.
Next Steps
This blog is part of my XM Cloud Site Build series, and in the next post, I will provide a detailed breakdown of how I resolved the 404 NOT_FOUND issue. Stay tuned for more insights on successfully deploying Sitecore XM Cloud to Vercel.
Have you faced similar issues with Vercel deployments? Drop a comment below!
Mid week February this year, I received an email from Sitecore about this great Sitecore MVP Mentor Program. Exited about it did not waste any more time but sent an email to mvp-program@sitecore.com you can do that now too.
This changed my plans a great deal. I met great people but one of a lifetime friend, coach and more so a Mentor Dirk Schäfauer. If you receive an email or any communication from him saying he is allocated as your Mentor for the upcoming year. Just grab the opportunity and no looking back from there. To can learn more about him at on his profile here.
Apparently there have been many experiences I have heard that this might not work as there could be cultural, language and time-zone related issues. But do not let them distract you. This program works and I am so lucky to have specially Dirk in the whole process got me to speed in his first meeting and I was falling behind. To know more about him please read this 10 Years 5 Questions
How to Apply
Good News is the date has been extended so you can submit the applications even today. Go to https://mvp.sitecore.com/Application/Apply and submit your Applications today by EOD.
Eligibility
Anyone who are greatly involved in using Sitecore and passionate about it, and are very driven to share the knowledge on Sitecore. A proven track record of contribution to the Community will be identified for sure.
Opportunity
Without EPAM Systems and specially a cool leader like Walt guiding me and following up from time to time on my goals has given me this opportunity. I will always be thankful and grateful.
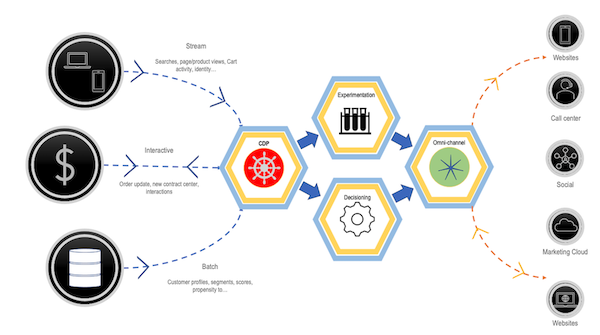
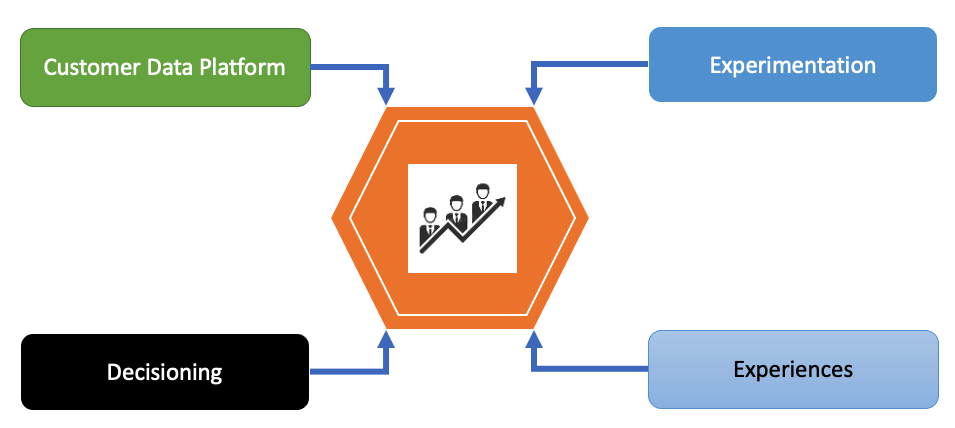
Mostly asked question is, What are the key differences between Sitecore CDP and Sitecore Personalize? I will try my best to simplify in this article. Before that few pointers
To Personalize we need to make certain decisions (real-time) using Customer Data.
Customer Data needs to be collected/gathered from various channels, analyzed and an interface and sites to A/B Test a concept and want to deliver a product that works. Justify a style, user experience (UX) or a Campaigns driven by a business Model
Most organizations might have already had the data part of the CDP, however the actioning part is what the Sitecore Personalize is for. So Sitecore CDP is all about getting data from multiple channels and storing for further analysis and processing. Personalize is the actioning part where you take decisions in providing a great experience to the customer interacting via omni-channel.
Sitecore CDP
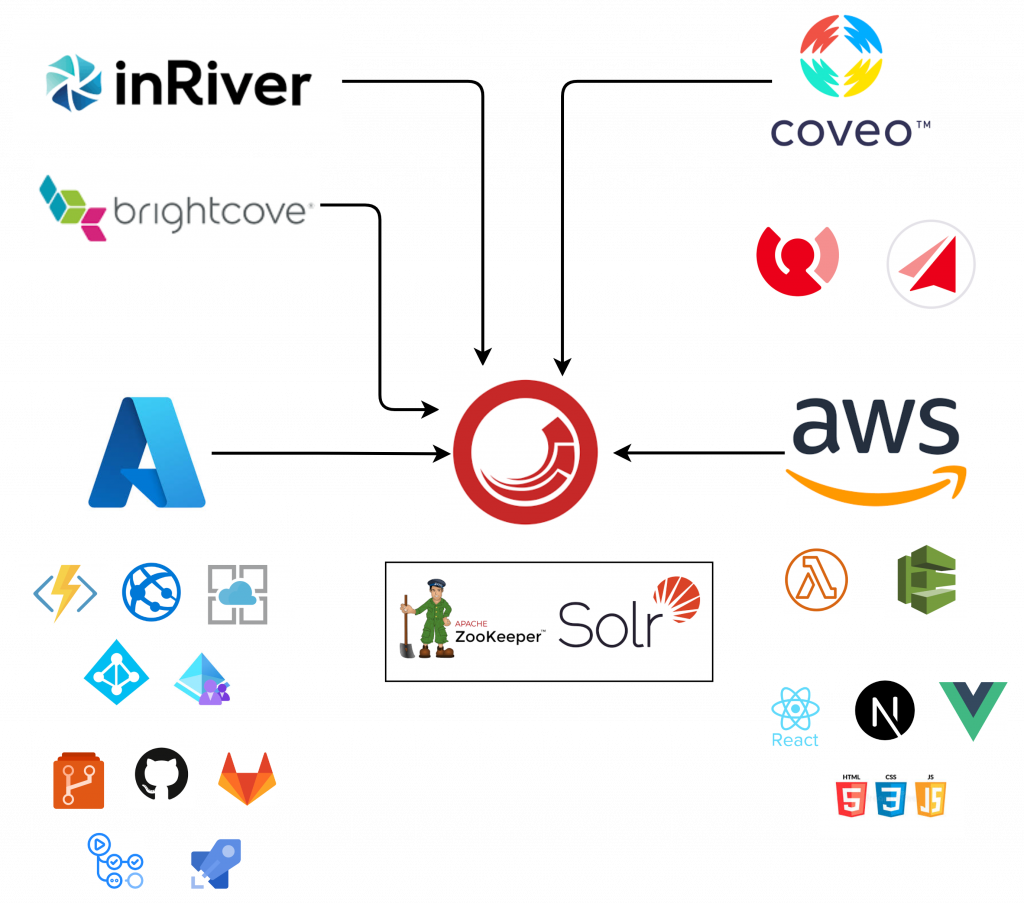
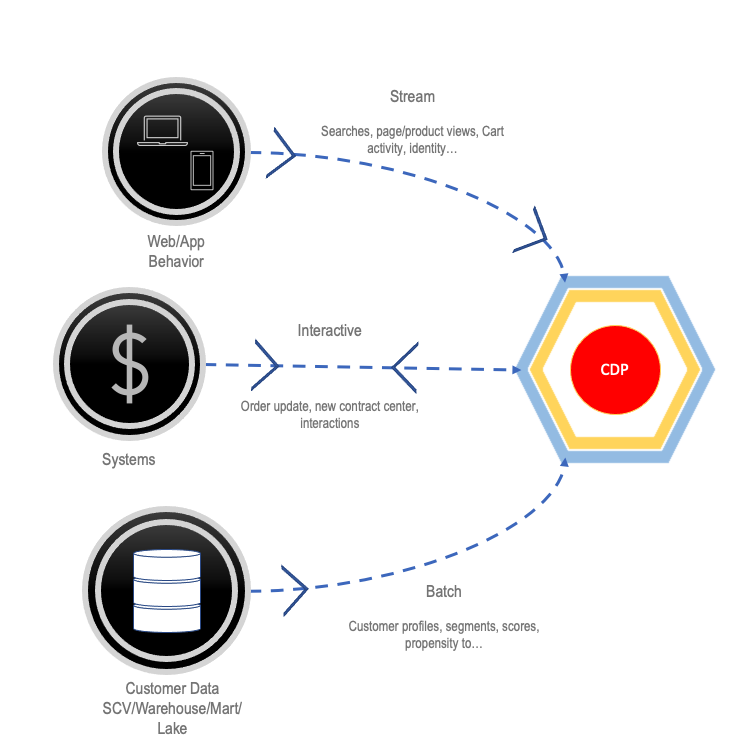
Is a rich set of tools for Data Ingestion from various methods like streams, batch and APIs
streams collect transactional data of guest which is transactional and behavioral in nature
large batches of data can be uploaded from enterprise systems using Batch APIs
A rich set of REST APIs provide CRUD operations
Creating profiles of visitors with or without Personally Identifiable Information (PII)
Sitecore Personalize
Sitecore Personalize
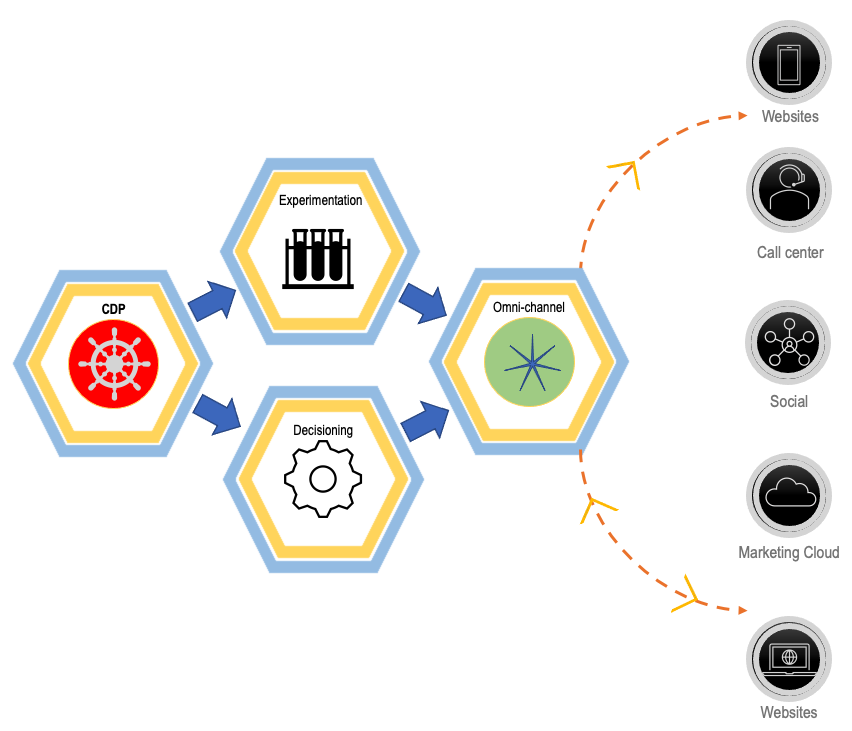
Is a set of tools to power the interactive experiments in real-time like triggered experiments, decisioning on the fly and performance analytics
to power an interactive customer experience
transaction and behavioral data is used to trigger personalization
similarly the data is used trigger experiments and A/B testing
There are few important aspects of Personalization
Decisioning, the rules engine used to determine what Personalization is rendered to the customer. While making decisioning external data can be used consuming REST APIs. Could be an AI Model some business data in real-time
Instrumental in providing the Next Best Action
Ability to send trigger a 1:1 message via Web Push or email
Imagine someone spent enough time but are exiting the site, basically abandoning whatever they have been shopping for. Called the Abandon Cart action, so an email can be sent
Abandon Cart a very common scenario we experience on all the sites these days, this feature can be implemented using Sitecore CDP and it is a breeze.
A lot of templates available and this is one of them, while you are in a journey of choosing some best products for your customers to present, keep in mind that they need to be dealt with care. Sometimes customers get drifted so you can notify where they are in their thoughts.
Sitecore CDP Stream API provide a great set of well defined API Services that is very easy to implement, faster to publish and efficient in performance. With few basic JavaScript tricks up your sleeve you are in your comfort zone.
Remember when your guests are set to ABANDON the Cart rescue them following this How-to-configure Sitecore CDP to handle Cart Abandonment.
Create Abandon Cart Experience
Create a Full Stack Triggered Experience
There are multiple options to configure your mail service provider. So create a Connection
Create a Decision Model
Connect the Decision Model to the Full Stack Experience
Create a Segment with few Business Rules ahead of time
Conclusion
The CDP Stream APIs provide simple steps to integrate and quick results of Sitecore CDP functionality. Online Data Capture, Site Personalization and Behavioral information from Events capture guest behavioral data in real time.
Third party cookies will be eliminated, and so will device IDs, so reaching your customers will be impacted. To enable the use of the Data across all the departments of any organization’s marketing effort will be challenged. Hence the solution is Customer Data Platform (CDP).
We build a lot of websites, mobile applications and interactive kiosks with one goal, to understand our customers needs and leverage all possible technology to deliver an engaging personalized experience. What we all know that our customers have access to all the channels and they do engage with very unique expectations. But, when we don’t know who the visitors are, where they come from when they seek for services and products. How can we deliver the anticipated experience?
We need to know our customers visitors at scale and speed! We need to segment the visitor’s information and analyze the data we collect about them.
The need is to have the data at one place, analyze it and get a meaningful understanding of the data. The goal is to make that identified visitor engage with our products and services, we need one unified source of reliable data to personalize the visitor experience.
A “Customer Data Platform” (CDP) is the solution.
Sitecore CDP
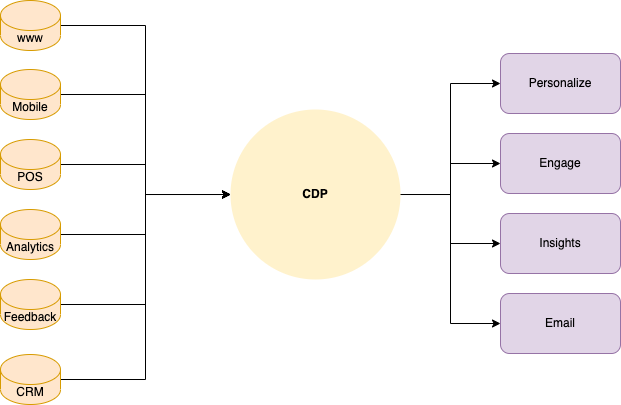
Sitecore CDP is one such reliable and powerful product from Sitecore. It helps by intelligently consuming data from multiple sources and provide a singular contextual profile for a visitor on any channel.
Definition
From the Gartner’s Glossary CDP is a vendor-neutral organization dedicated to help marketers manage customer data. It is a packaged software that creates a persistent, unified customer database that is accessible to other systems.
This software should build customer profiles by integrating data from multiple sources, e.g. transactions of users in a “Customer Relationship Management” System (CRM), any interactions or activities on web and mobile apps, interactions with kiosk in marketing hotspots, etc.
They both collect data. CDP creates Profiles with the collected data from omnichannel platforms, while CRM tracks customer interaction. The data in a CRM is mostly collected manually.
CDP Provides the capabilities to experiment with the collected and curated data. It consolidates all the data from omnichannel platforms and prepares the dashboards to visualize the customers profiles. This is a great tool for business users!
CDP helps in an easy way to model decisions in real-time.
CDP Unifies Profiles
Sitecore CDP, unifies by merging the user data to one targetable profile. With this major part of the process taken care of the Applications can use the data and start the marketing efforts.
Intelligence
Decision Tables, are being used to deliver methods to map data to experiences and actions to start delivering experiences.
But a strong Analysis needs to be done before hand to with good Reasoning and then prepare the data to Act upon. Sitecore CDP performs all this smartly and provides a unified Identity, by merging the data collected from multiple sources.
This supports your business users to create a hypothesis and make informed decisions to deliver personalized experience to the customers. That too with reliable guidance and no-code templates. That’s intelligent!
Experiments
Marketers can provide next best action tailored to individual customer profiles based on the experiments conducted before hand. Emails, SMS and online experience of the customers can be carefully crafted. Fulfilling customer needs and their business goals is a great win-win situation. Sitecore CDP enables the business to experiment and leverage the results to personalize on one interface.
Next
This is a series of blogposts and articles as mentioned in my previous blog post. Please stay tuned and follow. Feel free to share your opinions and ideas.
[This article] Introduction to CDP
How is Identity Resolution, How is it done in Sitecore CDP?
AB Testing & Personalization
Performance Measurement & Segmentation
Analytics & Beyond
In addition, there will be a YouTube video with more details on every topic. Here is the link to my Sitecore Sanjeev YouTube Channel.
Sitecore introduced Sitecore Identity (SI) since version 9.1. This is a mechanism to log in to Sitecore. It provides a separate identity provider, and SSO (Single Sign-On) can be configured. This made the Sitecore instance architecture very scalable.
This concept is primarily an interaction between the Sitecore Identity Server and Sitecore Identity Clients.
Sitecore Identity Server
An OpenID Connect-compliant security Service. The deployment of any instance now has this server as an isolated instance living in the same Resource Group as configured. The URL is of the pattern https:://{instanceName}.{identityserver}. Sitecore Identity Server only works with HTTPS protocol.
Sitecore Identity Clients
A client is an application that authenticates users who are using the SI server. Each client must be registered with the SI Server before it can be used. The SI client requests security tokens, validate them, and create context users from these tokens. It can also bearer tokens to make authorized request to other services that are configured to accept tokens.
One of the examples could be Web Applications, Mobile or Desktop Apps connecting to the server. In this case the client is the Sitecore Instance itself. The Content Management Node can be used as an example.
Configure Azure AD
Register an Application, add to approved application in the Azure Active Directory Instance. We need the following handy before we configure the Identity Server.
Add the redirect URL to the Identity server URI. And also the suffix “/signin-oidc”
You need to enable ID Tokens to be passed between AD and Sitecore Identity Server. In the Application under Authentication enable “ID tokens”
Make changes to the Manifest.
Copy the following for use from the Overview of the Application
Application (Client) ID:
Directory (tenant) ID:
Example Manifest
Configure Sitecore Identity
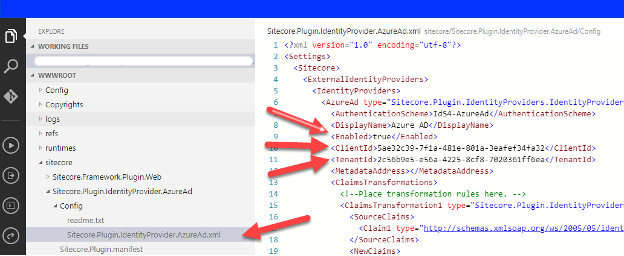
In the current instance, open the App Service with the Azure provided editor (in preview). Or establish FTP and navigate to the “/Sitecore/Sitecore.Plugin.IdentityProvider.AzureAd.xml” file and make the following changes:
Under Settings:Sitecore:ExternalIdentityProviders:IdentityProviders:AzureAd, change the Enabled node to true.
In the ClientId and TenantId nodes, you’ll paste the GUIDs copied from the Azure AD Application you just created.
User Transformation
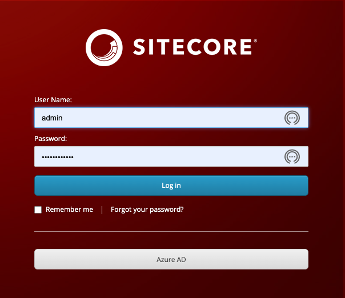
Identity server typically do not recognize external accounts, when the Azure AD Credentials are passed by clicking on the Azure AD Button seen below (created in our earlier steps) the role/permissions are not set automatically. This could cause failure to authenticate.
Azure AD Login Enabled
To resolve that we need to create a group in Azure AD to use the Object ID of that user group and update the configuration in the Identity Server config file to setup a transformation.
Azure Group Setup
For this POC if you can create a temporary AD Group that is useful or use an existing Group, this is totally your choice base on the Security Governance Policies you have within your organization.
Transformation Setup
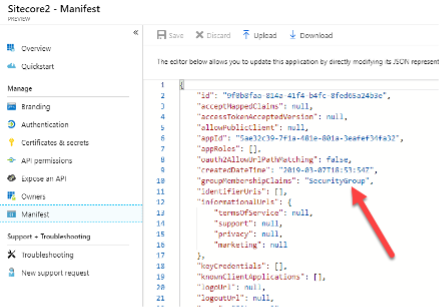
A sample code is present in the “\sitecore\Config\Sitecore.Plugin.identityProvider.AzureAd.xml” a sample is below
In the above step with the changes to the GUID for groups we have a claim setup as a Sitecore Author see the line 38 in the image provided above.
Similar to this we can create multiple claims and map each Group in Azure AD to a Role in Sitecore. We can have different type of Roles with various levels of permissions and restriction on each content Item to be very granular or site/tenant for that matter.
Important configuration
The custom user builder config needs to have the resolve=”true” as the code snippet below
Once the above configurations are setup, restart the App Service for the Identity Server and navigate to your Identity server URL.
Click on the Azure AD button and a typical login screen should appear, once you have logged in successfully the user should land on the Sitecore dashboard.
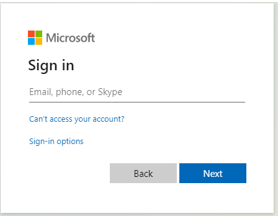
For convenience go to the CM server making sure you are not logged in, this will navigate you to the Identity Server URL, click on Azure AD button this will navigate back to your classic MS Login screen. On successfully authenticated the user will land on the CM Server.
Best Practices
Typically in any organization there are many users, not all users will end up using Sitecore. The best practice is to allow users with respective permissions by adding them to the respective Groups in AD, have a mapping Role in Sitecore and a Sitecore Admin can move them to an appropriate role. There could be a Blanket Role created in Sitecore so all the newly created users will fall into that group initially. Subsequently a User Admin can assign them the required Role(s).
After acquiring Boxever Sitecore has really built the product into its Platform to Offer a Powerful and Unified experience for customers to take advantage of Customer interactions on omni-channel.
It is actually designed to propel the experience of configuring and deploying various aspects of Digital Marketing like decisioning, predictive analytics, experimentation and orchestration. Using very intuitive toolset for Developer Experience.
After attending the Deep Dive provided by Sitecore, I have gained a lot of insight about the product. And with the experience of using the Product I am very excited to share this with all of you.
Overview
I will be touching on the Theory a little bit and cover some configurations with examples scenario in this series. I think it will be good to break them down to smaller chunks, following will be the topic breakdown
I was trying to get few of my experiments on Sitecore this afternoon, and spent a lot of time getting the Sitecore Docker Instance running on the lowest of Memories on an Oracle Virtual Box, Windows 10 VM, yes with 16GB RAM. This has been pending since I always got into issues running this. I thought may be it is Mac, or may be it is the 16GB or something else. And kept this project pending. So much for waiting. I thought this has to happen today. So I solved this issue. Hope this will be helpful to few of you.
The bare necessities to run Sitecore is the “License”, we cannot avoid that part. I always thought this was set (configured) properly. Found out that was not the case. I was under the impression that the content of the file when passed to the “compose-init.ps1” and it will run as expected when we pass in the file plain. Like below
This command execution just worked find, but when I started the instance “docker-compose up -d” will not work.
Yes, I did all the following
iisreset /stop
docker-compose stop
docker-compose down
docker-compose up -d
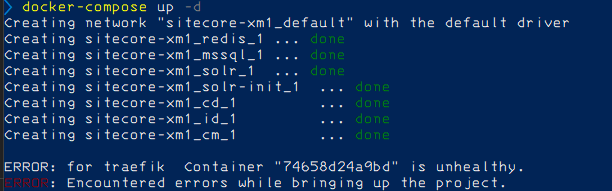
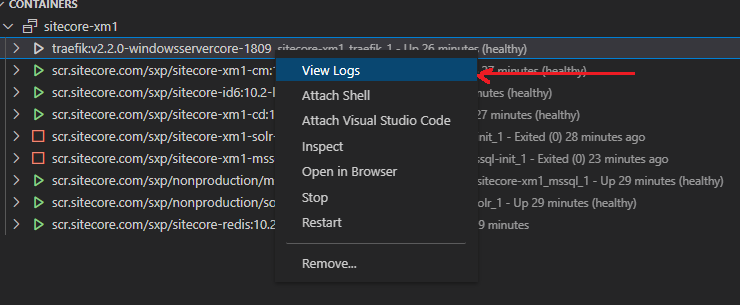
But the situation continued, traefik fails, so did a deep dive on to the logs to see what did happen. Try the right-click on the running docker instance in question like below, since Visual Studio Code makes it convenient
Visual Studio Code with Docker Extensions (very hand)
Learnt that the exceptions were thrown related with License, this was easy to fix. So made sure the files are in place, opened the file to view the content and everything was fine.
Run the “docker-compose up -d” again, nope. Same result.
Read the Sitecore Link for more details. But I noticed that the “.env” file never got updated, however this worked for me. And no more traefik issues. Instances are running the successfully.
Happy Coding, Sitecore on Docker is the fun and all of us need to have this handy for any tests and development ofcourse.
Success on PowerShell
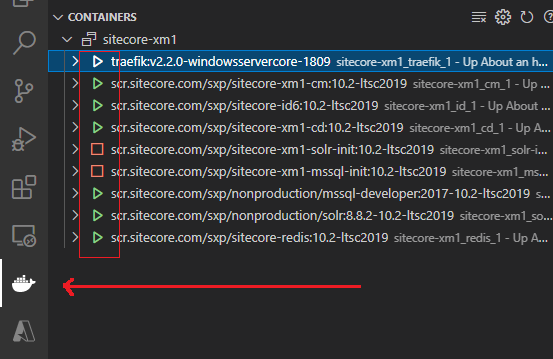
Visual Studio Code Extension for Docker is the best. I have been using this long enough and I recommend you all to use too.
All Green, but I am yet to find the solution for those small red squares